Deploying a Laravel Application with Deployer and GitHub Actions
I share a surprisingly simple zero-downtime deployment technique that utilises Deployer 7 and GitHub Actions to automatically and atomically deploy Laravel applications.
I've seen some complex deployment strategies for Laravel applications. Deploying a project is not the most fun at the best of times, and can be made all the more painful with a convoluted deployment strategy.
In the past, we used to turn a website off, FTP up all the new assets, and then re-open it, but those days are long gone, and if you're still using FTP to deploy Laravel, you shouldn't! Today, it's common practice to use a software technique called atomic deployment.
There are paid services out there offering hosted atomic deployment services, such as DeployHQ, but I really can't recommend them when it's so easy to do and, better yet, free!
What is atomic deployment?
Atomic deployment is a strategy where updates are made in a single action. If the deployment fails, the operation can be rolled back to ensure a consistent, zero downtime approach. A common technique to achieve this is by using symbolic links. Almost all atomic deployments will use symbolic links behind the scenes.
You upload all of your files to a folder, and then once you're ready, you update your live folder (example: /home/you/live-website.com) to point to your latest release (example: /home/you/releases/20240325). Once the symlink has been re-linked, anyone visiting the website will immediately be given the new files from the new folder, without any downtime. If you need to rollback, you can simply change the symlink back again.
Seems simple? It is, but with a complex and powerful Framework like Laravel there are a few more elements to consider.
Considerations
When deploying a Laravel application, there are more than just files to worry about. You have to compile your assets, run your migrations, flush your caches, re-cache your routes, views, events, and config, restart any queue workers and link your shared storage. That's quite a bit of work, lots of commands to remember, and has to be run in a very specific order!
What's the answer?
I'm glad you asked, it's Deployer! I've been using this excellent PHP based package for ~5 years now, atomically deploying sites of all sizes. It can be quickly and easily installed into your project as a composer dependency that can be run locally, or even integrated into your GitHub deployment strategy. It offers atomic deployment over SSH using the rsync protocol.
Once you've installed the package and configured your deployment file - stored at the base of the project in a file called deploy.php - you can immediately begin deploying to multiple environments by running a simple command: dep deploy your_environment. This manages all the steps of deploying a Laravel application using its Laravel 'recipe'.
It'll even lock the environment to prevent others atomically deploying at the same time!
Installation
- Install Deployer:
composer require deployer/deployer --dev
- Configure your environment. I've highlighted the lines you'll most likely need to change:
deploy.php
<?php

namespace Deployer;

// load in the Laravel recipe, this will do the heavy lifting.
require 'recipe/laravel.php';

// tell Deployer where your Git repository is
set('repository', 'git@github.com:example/your-repository.git');

// the http user, generally the same as the SSH/remote_user
set('http_user', 'username');

// configure your environments, you can have as many as you like here!
host('production')
    ->set('labels', ['stage' => 'production'])
    ->set('hostname', 'server.example.com') // the server hostname
    ->set('branch', 'release/production') // the git branch to deploy
    ->set('remote_user', 'username') // the SSH user
    ->set('deploy_path', '/home/username/htdocs/production'); // the path to deploy to


// its likely that you can get away without modifying anything more
// and you'd have a successful deployment at this point.

// define the paths to PHP & Composer binaries on the server
set('bin/php', '/usr/local/bin/php');
set('bin/npm', '/usr/local/bin/npm');
set('bin/composer', '{{bin/php}} /usr/local/bin/composer');

// a couple of additional options
set('allow_anonymous_stats', false);
set('git_tty', true);

// now onto the build steps, in most cases, you can leave these as below,
// but you can add or remove build steps as required!

// compile our production assets
task('npm:build', function () {
    run('cd {{release_path}} && {{bin/npm}} install');
    run('cd {{release_path}} && {{bin/npm}} run build');
    run('cd {{release_path}} && {{bin/npm}} install --omit=dev');
})->desc('Compile npm files locally');
after('deploy:vendors', 'npm:build');

// automatically unlock when a deploy fails
after('deploy:failed', 'deploy:unlock');

// after a deploy, clear our cache and run optimisations
after('deploy:cleanup', 'artisan:cache:clear');
after('deploy:cleanup', 'artisan:optimize');

// handle queue restarts
after('deploy:success', 'artisan:queue:restart');
after('rollback', 'artisan:queue:restart');
- Run your deploy command,
dep deploy productionand watch the magic happen!
What's the catch?
Now of course, there's a little more to it than that, you need to create a shared folder inside your deployment directory which contains your environments .env file and storage folder. You'll also need to ensure all of your environment variables are configured, such as database credentials etc. But you'd need to do this regardless!
You'll also need to make sure that your server is mapped to your public folder. So in the example above, we'd want to configure our nginx root directory to be /home/username/htdocs/production/current/public.
Going further
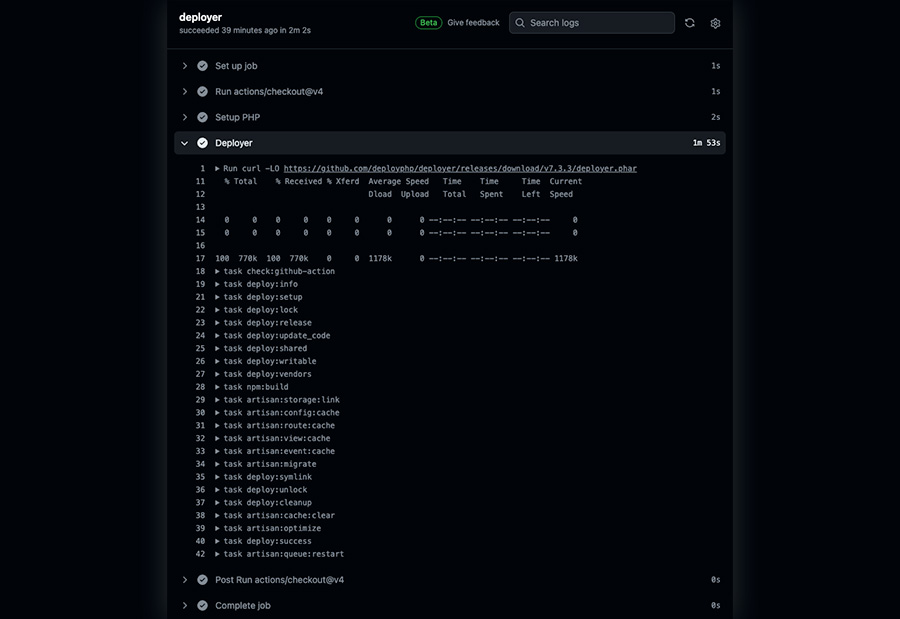
We've now got atomic deployment up and running in a matter of minutes thanks to Deployer, but we can take that a step further and integrate a GitHub action so that when our codebase is pulled into one of our release branches - release/production branch for example - we'll automatically, and atomically deploy it where it needs to be.
DeployPHP/Deployer already have their own GitHub Action implementation, but I've found it to be more convoluted than simply pulling down Deployer's PHAR file and running that. This means that you don't even have to have deployer installed as a local dependency!
.github/workflows/deploy.yaml
name: Deploy Production

on:
  push:
    branches:
      - main

permissions:
  contents: read

concurrency: production_deploy

jobs:

  deployer:
    runs-on: ubuntu-latest
    environment: production

    steps:
      - uses: actions/checkout@v4

      - name: Setup PHP
        uses: shivammathur/setup-php@v2
        with:
          php-version: '8.3'

      - name: Deployer
        run: |
          mkdir -p ~/.ssh && echo -e "Host *\n    StrictHostKeyChecking no" > ~/.ssh/config
          echo "${{ secrets.DEPLOY_SSH_KEY }}" > ~/.ssh/id_rsa
          chmod 400 ~/.ssh/config ~/.ssh/id_rsa
          curl -LO https://github.com/deployphp/deployer/releases/download/v7.3.3/deployer.phar
          php ./deployer.phar deploy production --revision=${GITHUB_SHA} -o ssh_multiplexing=false -o forward_agent=true
Authenticating with GitHub Actions
To successfully deploy using GitHub actions, you'll need to set up a 'Deploy Key'. We'll also use this deploy key as the SSH key that can login to the user account on your server. This way, we have two way interaction between the server and the GitHub repository. GitHub is able to login to your users account, and your users account is able to login to GitHub to pull the repository.
Caution: It's important to note that this procedure will grant GitHub Actions to login to the user account on your server. You'll also need to ensure that your SSH ports are exposed to GitHub Actions. Alternatively, you can configure GitHub self-hosted runners that run within your own infrastructure.
- Create a new SSH key pair with no password. You can do this by running the command below. This will create a private key called
deploy_keyand a public key calleddeploy_key.pubin the current directory with no password.
ssh-keygen -t ed25519 -f ./deploy_key -N ""
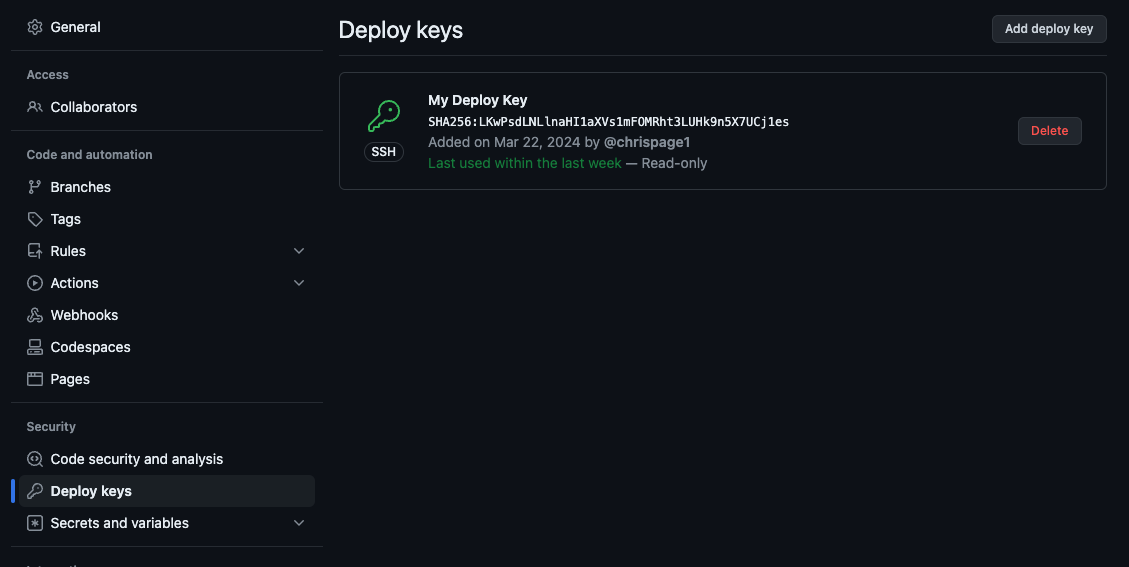
- Copy the contents of the public key
deploy_key.puband add it to the repository's deploy keys. You can do this by going to the repository settings, thenDeploy keysand click onAdd deploy key. - Add the contents of
deploy_key.pubto yourauthorized_keysfile on your server (normally~/.ssh/authorized_keys). This will let your server know that GitHub should be granted access. - Copy the contents of the private key
deploy_keyand add it to the repositories secrets. You can do this by going to the repository settings, thenSecrets and variables,Actionsand click onNew repository secret. - Name your repository secret
DEPLOY_SSH_KEYand paste the contents of the private key in the value field.
Top tip
If you're running MacOS, copying the contents of entire files is simple. Dive into terminal and run cat deploy_key | pbcopy. That'll copy the private key contents straight in to your clipboard!
You're ready!
It's time to give your integration a go, if all goes well, you should be able to deploy your project autonomously using GitHub Actions! I use this exact strategy (although admittedly I do use a self hosted runner) and pretty much these exact same files to update my blog, and countless other projects. I hope you enjoyed this article, and if you did, why not subscribe for more?